10 Photography Tips
Selection
Turn the Camera on it's Side
At first it feels awkward holding the camera on it's side, but it is worth getting used to. If the shape of your subject, a person or a building, fits into an upright rectangle, you waste so much picture space if you shoot in landscape. You paid for all those millions of pixels, don't waste them.Framing
Direction of Lighting
Direction of Lighting (2)
In Camera Flash
Exposure
Shutter Speeds
Apertures
Neutral Density Filters
 Select only the best of your pictures to show to others and leave the rest in the drawer. Showing someone every picture you have taken dilutes the effect of the best pictures and gets very boring. You may want to show twenty pictures of little Johnny at the park because they are all quite good and you can't decide which are the best but, trust me, you will be better off making that decision and showing only the few good ones.
Landscape or Portrait?
A lot of people never, ever turn their camera on it's side and shoot an upright picture. Yes, it can be a little awkward to hold until you get used to it but, what a difference it can make to the picture. If you are taking a picture of one person then it is essential to shoot upright, you waste so much of the picture area at the sides if you don't.
One of the easiest ways to improve your photography is with careful attention to framing. Look into the corners of the viewfinder to see what is there. Do you need all that background? Can you get closer to your subject or zoom in?
Can't I leave the cropping 'til later?
If you are printing your own pictures then you get a second chance to get the cropping right but, don't rely on this to make up for sloppy camera technique. If you crop your pictures afterwards in the computer or in the darkroom, you are throwing away quality. You are wasting some of those precious pixels that you paid so much for. What's the point in having a camera with five million pixels
Photography is all about light, the direction of the light falling on your subject is most important, you must look at your subject carefully and see how the shadows fall.
If you are able to choose the time of day to shoot your pictures, try to pick a time when the sun is low in the sky, either shoot in the early morning or late afternoon. Shooting pictures of people with the sun too high in the sky, tends to mean the subject's eyes will be in shadow and/or your subject will be squinting in the strong light, both of which tend to look horrible. A nice side effect of shooting in the early morning or late afternoon is that the colour of the light is 'warmer', reds and yellows are stronger which generally gives a more pleasing effect.
If you are photographing in sunlight, try to position yourself so that the sun hits your subject from the side, this will give you nice 'modelling' and help create a 3D effect in the picture.
Sunlight behind the subject can give a very pleasing 'backlight' effect but be careful that you are not getting 'flare' in the lens, which degrades the contrast of the image.
The very worst kind of lighting is provided by the little flash fitted into all modern cameras. Not only does it give your subjects the dreaded red eyes, but also flattens all faces into shadowless featureless blobs. Use the in camera flashlight only in an emergency, when there is no other choice.
When you have to use the in camera flash, keep your subject(s) away from walls, especially light coloured ones, if at all possible, and avoid that ugly black shadow which looks like an outline. This will not show up against a dark background.

If you have a modern camera, the chances are that the default metering system is 'centre weighted average', which means that, although it takes an average reading of the whole scene, it takes more notice of what is in the middle of the frame. Which is good news for us. The other good news is that it takes this reading at the time when you take 'first pressure' on the button to take your picture. When you push it halfway down and it beeps at you, not only is the focus now set (on an auto focus camera) but the exposure reading is taken and the aperture and shutter speed are set. So, if your main point of interest is not in the centre of the frame, it's a good idea to put it there temporarily while you focus and take your light reading, then move the camera whilst still holding the button halfway down and compose the picture the way you want it to be. A common use for this technique is when you are taking a close up shot of two people and there is space between their heads, if you're not careful the camera will focus on the wall or trees behind them. If the background is very dark or very light this can alter the exposure significantly and result in faces that are too dark or too light.
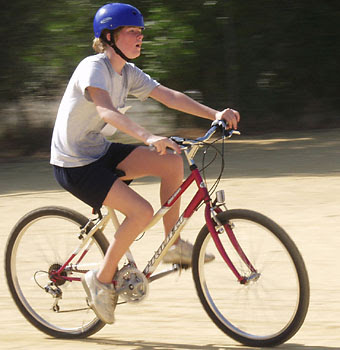
When the shutter speed is important as with moving objects, it's a good idea to set the camera to 'Shutter Speed Priority' mode. This is where you select the shutter speed and the camera selects the appropriate aperture according to the light reading.
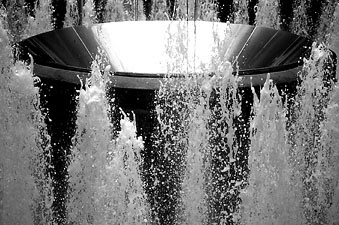
Shutter Speed Example
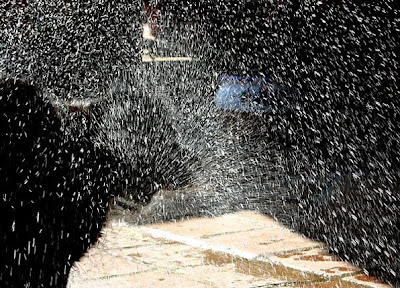
Here are two photos of the same fountain shot at different shutter speeds. The top picture was taken at a fairly fast speed, about 1/500th of a second and has frozen the drops of water in mid air.
The bottom photo was taken using a slower shutter speed, in other words the shutter was open for a longer time, which has allowed the fast moving water to blur a little. I don't remember what the shutter speed setting was for this shot but I would guess it was about 1/30th of a second because the camera was handheld and the bowl is quite sharp. At shutter speeds slower than 1/30th of a second it is quite difficult to hold the camera steady enough to get a sharp image. You need to use a tripod.

The static bowl of the fountain remains the same in both photos.
Whilst adjusting the shutter speed it is necessary to adjust the aperture in the opposite direction to ensure that the same amount of exposure is given to the film. If you use the 'shutter speed priority' setting on your camera this will be done automatically for you.
As well as letting more or less light into the camera the size of the aperture you choose governs the 'Depth of Field'. Depth of field means the amount of the picture, from foreground to background, that is in sharp focus. A smaller aperture will give you a greater depth of field and a larger aperture will give you a more restricted depth of field. This characteristic can be used to good effect in many ways.
If you are photographing vast landscapes on a sunny day, the chances are that everything will be in focus and you will not notice this phenomenon at all. Depth of field, or the lack of it, is much more noticeable when taking close-ups. As I mentioned in the section on moving subjects, it is often desirable to render the background of your picture out of focus. This is easy to achieve by selecting a larger aperture to restrict the depth of field.
Conversely, when photographing very small objects (as in the picture opposite) getting everything in focus can be quite a challenge and may require a very slow shutter speed in order to be able to use the smallest aperture available. The focal length of the lens makes a difference to the depth of field available, the longer the lens the more restricted the depth of field. A wide angle lens will give you almost limitless depth of field.
Tip - If depth of field is important to either make sure everything is in focus or to throw some things out of focus, select the 'Aperture Priority' mode on your camera. In this mode you select the aperture and the camera selects the shutter speed according to the available light.
Tip - If you are shooting in bright light and want to restrict the depth of field, use a neutral density filter in front of the lens to reduce the light entering the lens. These are available in different densities, 2x, 4x, 8x etc. each one cutting the light in half, quarter, eighth etc. In extreme circumstances you can screw a couple of them together. Although they are 'neutral density' filters and should not effect the colour balance, if you use two or more together you might need a little colour correction at the printing stage.
chnical Stuff - Shutters Speeds and Apertures
What do the numbers mean?
If you look at the exposure display in your viewfinder you will see two numbers. On a normal sunny day you might see something like '125 16' or '500 5.6'. The first number is the 'shutter speed' and is simply the time that the shutter will be open for, expressed as a fraction of a second. So 125 means that the shutter will be open for 1/125th of a second, and 500 means that it will be open for 1/500th of a second.
The second number, sometimes referred to as the f-stop, tells you the size of the hole (aperture) in the lens. This number is also a fraction. The number represents the focal length of the lens divided by the diameter of the aperture. So an aperture that is 10mm in diameter in an 80mm lens will have an f number of f/8 and the setting f/16 on the same lens will be 5mm across.
From this you can see that if you change the lens to one of, say, 160mm focal length then the size of the f8 aperture will be 20mm. However, because the diaphragm is now twice the distance from the film the same amount of light will reach the film. This is a bit complex but if you have a mathematical bent and you draw it all on paper you will see why (see inverse square law). If not, just take my word for it. Now you can see that a larger 'f' number, say f/16, is actually a smaller hole and lets in less light than f/8.

Large aperture = small f number

Small aperture = larger f number
To make matters even more complicated, modern lenses, sophisticated beasts that they are, are not always physically the same as their focal length. So the good old f-stop acts as a nominal indicator of how much light will reach the film, rather than an accurate measurement of aperture size. This amount of light is independent of the focal length of the lens.
If you are shooting in bright light and want to restrict the depth of field, use a neutral density filter in front of the lens to reduce the light entering the lens. These are available in different densities, 2x, 4x, 8x etc. each one cutting the light in half, quarter, eighth etc. In extreme circumstances you can screw a couple of them together. Although they are 'neutral density' filters and should not effect the colour balance, if you use two or more together you might need a little colour correction at the printing stage.





No comments:
Post a Comment